Pages

Thursday, December 29, 2016

Good old fashioned toys

I traveled to the Panama Canal and was away from home for 10 days right before Christmas.  So, for the first time in years I was ready for the holidays by Dec 1!  Gifts made, gifts purchased, all wrapped and under the tree or packaged and mailed.  When I returned on Dec 21, I wanted to walk in the door and not have to rush around finishing up holiday plans.  And that's exactly what I did!

But, then I walked into the garage and had the strongest urge to make toys-crazy!  In the past 7 years, I've learned to go with crazy!

Here's what I ended up with. Truck, cars, helicopters.  


Little Doc loved his little car, and my neighbor kids enjoyed their gifts, too.  The helicopter will be a "stay at Grandma's house" toy for Little Doc.  

Kind of cute, aren't they!

Wednesday, December 28, 2016

And even more storage

My sis has a lot of "stuff"!  But, she doesn't have a lot of cupboard space.  What to do, what to do-it was a dilemma!  So a few weeks ago I built a tall, wide cabinet to hold all of her China and large serving pieces.  This past week I finished a low cabinet that will give her even more storage and also provide serving space.  It too is a pretty farmhouse style.  I'm getting lazy, so only primed the cabinet-sis will paint with a semi-gloss Bher in white, Polar Bear.  I did stain the maple top in a rich dark Minwax espresso.  Three coats of minwax oil-modified polyurethane should protect it from minor spills.

Ready for pick up!!

Body has a coat of primer. 

In place in my Sis's home


Sunday, October 30, 2016

Storage, storage and more storage

My sis needed storage for china and glassware - and she needed doors to hide the mess!  No glass doors for her, no siree.

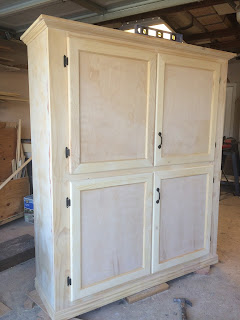
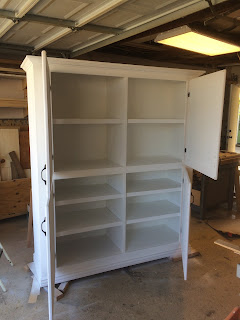
So what she got was a big old cabinet with lots of shelving- and doors!!

They were here early today to pick it up and she sent me a picture of it as she was loading it up.  She also requested two more shelves - more storage!

She offered to paint it, knowing that finishing is not my favorite thing to do.  But, I thought it might be a good idea to try my hand at using a HPLV sprayer.  So, I did.  The finish is not the best, and I feel bad about it.  However, after about 7-8 coats of paint sprayed on I was FINISHED!  There's still some blotchiness - like paint went on heavier each pass.  I'm not sure, but I don't think I had the spray gun adjusted correctly.  And, it was a cheap gun.  Don had a really nice spray system that I gave to my neighbor shortly after Don died.  When he heard my compressor going for hours on end he brought it back to me.  He said he'd never used it and that maybe I'd get more use out of it now.  I really think he was just tired of the noise, but in any case, I'm going to use it for my next project and hopefully, it will turn out better.  Sorry, TeeBird...

This measures 5' wide by 6' tall.  It's about 18" deep.  I made 6 shelves, but it will have 8 shelves soon.  It's loosely patterned after the Pottery Barn Sedona cabinet.

It was painted white, satin finish (and may get a semi-gloss coat added by my sis).  The white paint and black hardware will match a buffet server that my sis currently owns.


In place and being loaded!


I do like how it turned out - aside from the not-so-perfect paint job.  And, she's very happy with it.  So, I'm happy, too.  It's found a home where it will be used and appreciated!
Thanks for letting me make this for you, Tee!

Saturday, September 10, 2016

Just love my grandkids!


With the end of summer looming, I made a visit to my logger family.  The county fair was over and the kids were excited about the sale of the pigs they'd raised, school had just started, the guinea hens that were just babies during my last visit, had grown and were now roaming the yard and woods around the house (and making a hell of a lot of noise!).  The new young chickens still weren't laying but they were hopeful for eggs soon - or the chicken dinner the lazy non-layers would become!  It was hot, but cooled down in the evening and you could feel fall coming on.  It was a wonderful time to visit.


Three kids, school, extracurricular things, dr's appointments, shopping, logging business stuff -  Logger daughter was back and forth to the BIG town (1 hr and 30 minutes away) like it was just down the street and around the corner.  

I was able to take in a high school volleyball game that logger granddaughter took part in, and my youngest logger grandson played in a travel ball baseball tournament.  And, we picnicked at a local winery.  Edenvale-it was such a nice place and the Cabernet was delish!


The rehab/remodel of their new home is somewhat at a standstill.  They have all been so busy that there's been no time to focus on the house.  But, logger daughter wanted to bring a bit more control to the boy's bedroom and really wanted them to have desks, with just a couple of drawers for "junk".  Once I finished them and had them set up in their room, the edict was "NOTHING BUT A LAMP AND AN ALARM CLOCK IS TO BE ON THE TEST TOP - OH, AND BOOKS WHEN YOU'RE STUDYING!"  She's really tired of their rat-packing ways.  

So, the desks.  I thought they should look like they were built to go with their beds.  Logger SIL, as usual, had plenty of boards for me to pick from!  This is a blessing and a challenge.  The boards are usually milled to real size - a 2x4 is really 2" x 4" instead of  1-1/2 x 3-1/2" like the boards I buy at the big box stores.  Measuring is the bane of my existence and I have to be more careful with these personally milled materials.

The drawer fronts were left natural, like the bed platforms, but we stained the basic structure of the desks a rich, dark brown.  
Image result for early american stain varathane
Varathane Early American   
Everything got a couple of coats of polyurethane - I searched for Minwax or Varathane poly, but none was to be found.  I bought a really, really expensive quart of water-based poly at the local ACE Hardware.  I can't remember what it was, it started with a C.  Worked great, but boy was it expensive at around $25 -I usually pay about $9.


Working at the Logger's home is more of a challenge for me.  Although Logger SIL has tools, they aren't mine and I'm not used to them.  Plus, at home my garage is my shop.  Their garage is still holding things they moved, and huge slabs of wood SIL milled.  (these slabs are being sold for table tops).  So, when I'm there, I pull the tools out of their garage and my shop is then out in the open.  In this case, I was in the sun.  

Pieces in the background are sitting on split logs - very useful to have around!

Testing drawer fit - in the sun.  

The end result is very similar to Camper Grandson's new desk (here).  But, these desks are regular desk height and have drawers, not just crates.  

Youngest grandson's desk

Oldest grandson's desk.  You can see a little peak of his bed frame.  He would rather sleep on the floor, so his bed is close to the ground.  Next time I'm there we're going to raise that bed about 8". 

The boys share a room that is like two rooms in one.  They each have their own side of the space, with their own closet.  I think the original house was added on to, and these extra large "dual" bedrooms are the result.  Very interesting set up. 


I like them, Logger daughter liked them, and the boys said they liked them.  I'm not sure they'll be able to keep the tops cleared!  Good luck with that, boys!

I'll bring the 2x4 stools up next time!

Monday, August 15, 2016

Summer - Where oh where has it gone?? And, how do I have a Grandson going into HIGH SCHOOL!

It seems like I've written less and less in my blog these days - and I want to change that!  I've been busy, but that's no excuse.  The sole purpose of this blog was to keep track of new things I built, attempted to build or completely failed at.  At some point, I hope in the far, far future, I may have difficulty doing things and, God forbid, remembering things.  That's when this blog will bring me the greatest pleasure, and hopefully, will be something my kids and grand kids will read, and re-read as they remember their old Mom and Grandma.  So, I need to keep up with this stuff!!

I've had a busy couple of months.  I traveled to see the Logger Family, and then flew to Colorado to join the Camper family.  The Docs have been busy, too, but I've managed to see them and Baby Doc a few times over the past few weeks.  Family - it's what keeps you going!

And, I've been busy working on projects.  My last couple of posts covered the major projects, but here's a run down of the most recent  big building project:

Camper Grand-son's bedroom:

My oldest granddaughter is going to be Junior in high school.  I've gotten used to that.  But now, my first grandson is starting high school.  I'm not sure how that happened!!!  RC wanted a new look for his bedroom.  Sooooo, his mom decided to go for a rustic, industrial look.  I think we hit the mark (except for the dresser, which came first and was supposed to be melamine-but that's sort of close).   I used 2x materials (fir) for the bodies and tops of the desk, nightstands and headboard.  1x basic pine boards for the crates and headboard panel.  Minwax early american stain was used on the bodies of everything, and layers of early american and weathered oak were used for the tops of the desk and night stands.  Weathered oak was used for the crates and drawer fronts.  All of it was sealed with matte polyurethane.  The tops got several coats of poly and should withstand anything this boy has in store for it!  Each piece has metal braces at joints and bolts added for the "industrial" look. (not all the metal pieces were on when these pictures were taken-hmmmm, I thought they were!)

Dresser for the closet.  The closet was going to be a major redo using melamine, but after building the dresser Camper daughter decided that just moving the wire shelving around a bit might work just as well.  She was right, so I decided to try to tie the closet storage into the bedroom by using pine and the same Minwax stain for the drawer fronts.  


Headboard


Night stands (note the initials added to drawers-last picture in group)


Desk (Bar height. Numbered crates are not drawers so they can be removed easily)


Wall decor (heavy wire hanger,  (hand painted, close to scale of official US Flag.  Distressed, then waxed with AS dark wax.  Frame is rough 2x white boards leftover from work done on my house.  Stained to match the headboard, 1 coat of polyurethane.  Flag is inset in center of the frame.  The back of the frame is an homage to RC's favorite sport - fly fishing!  I don't know if he'll want to flip it that side, but if he's missing fishing, he just might!


There's also a big "drawer" for under the bed.  It's on sliders and hopefully is easy to pull out and push back in.  It's not for things he uses every day, but it should hold his guns and all his fishing poles!

It's still to be delivered and put in place.  Waiting for some other things to be moved out of his bedroom.  Ryan has been using, since he first started sleeping in a bed, the same bed that his dad used.  It was made by Camper SILs grandfather.  It's beautifully made of oak, with drawers and bookcases beneath the mattress.  It's big and heavy and has to be taken apart and moved to another room.  That bed is an heirloom.  The stuff I've made RC is not!  I hope he enjoys using it but, he can use it for as long as he wants, and when he doesn't want it anymore, he should give it away (if it's still in working condition!) or burn it!    Welcome to high school RC, I enjoyed making this and hope you enjoy your new room and that it gets you through the next 4 years!

Sunday, June 19, 2016

It's an entertainment center, no wait, it's a desk!

The past couple of weeks I was working on the Monster table for the Docs.  There was a lot of  time between finish steps when I was basically "watching paint dry".  I needed something to do.
Camper daughter had mentioned that she wanted to redo her son's bedroom but that she'd need to redo the closet organization before she could do anything to the bedroom.  She also mentioned that she'd like a small, simple desk for her office.  Well, the office and her son's room are going to be going through their changes at the same time since furniture in one room will be switched out and moved to the other room.  I figured it would help if the desk were completed, and the closet organization stuff was ready to go once the "move" got started.  The closet stuff is started, and Thanks to a lucky find, the desk is complete.

I've mentioned before in this blog that I have a couple of favorite thrift stores that I like to scrounge for tables and things that I can use for my projects.  One day shortly after my conversation with Camper Daughter I was in the thrift store when all furniture was 50% off.  I eyed an oak entertainment center - you know what I'm talking about, I think we all had one.  Like this:


This isn't the one I bought, but it's very similar (see mine in the truck bed).  In any case, I saw it and thought "desk".  So, I brought it home and had my way with it!

I had to take all the doors off of it before I could get it out of the truck.

Here, if you look closely, you can see the black line I drew where I planned to cut it to desk height.

The top came off easily.

And, it was pretty easy to get it cut down to size.


Here it is, right after I took the circular saw to it and redesigned it to have two sides and an open center, and with the top just sitting on it.


I added another short piece to create a small open area on the right side. (disregard that piece in the back - it was there temporarily to stabilize the piece while I worked on it.) And, sanded and filled areas, and added a taller base moulding (not seen in this picture).

And, almost ready for stain and paint


And, finished.  I used a homemade chalk paint and applied a couple coats of polyurethane.  The top is stained with Minwax Dark Walnut.  There are shelves for each side so that she can add baskets to hold her paperwork - or, if she decides that a drawer on the left side will be better use of the space, I can use the door I saved and painted to make one.

Not too shabby for an old piece of furniture.  And, for $35 it's darned close to just what she wanted!  This has been delivered and is in place.  I don't think she's had time to sit down and work at it, but I do know that Camper granddaughter used it as a sewing table and confirmed that it's a great work space!

First part of the reorg done.  Closet organizer due about July 10th!

It's hot as heck right now - hopefully after a couple weeks visiting Logger daughter and family it will be cool enough to work here.

Happy summer!

Another Monster Dining Table - DONE!

Well, the Docs finally figured out that I'd somehow screwed up the measurements on the original dining table I made for them.  Remember this one?


I'm not sure how it happened (ok, I just read the measurements wrong - no big deal, right???), but the width of this table was only 33".  It really worked just fine for dining, but the problem was that with plates on each side of the table there was no room for serving dishes in the center of the table.  When we ate at the Docs, it was always buffet style!

Several months ago they mentioned that they might want to increase the width of the table.  We talked about just making a new top and replacing the original top with that.  However, I wasn't sure if the base was wide enough to support the additional 7-10" they were looking for.  

I didn't jump right on this project, but after 5-6 months I started feeling bad and brought it up again.  I asked if they wanted the same style or something different, and most importantly what size they wanted the table to be.  They came up with the size and said they were open for something different.  During the time I'd been thinking of this I came across a web site for a designer of some very interesting furniture pieces.  (http://thedesignwalker.tumblr.com/post/127306051246/meyer-von-wielligh-furniture) I absolutely loved a leg that he'd used on a table and showed that to the Docs.  They loved it, too, and decided that they liked not just the leg, but the table.  Here's what started this whole, challenging process:  

Isn't that the sleekest, simplest leg EVER???  Well, I thought it was cool, and so did they; I had a starting point.  I wasn't sure I could pull off this leg - and I really didn't.  But, I came kind of close.  It took a lot of thought,  
My starting point - which underwent several changes when I just couldn't work out the angles!!


A whole lot of planning and trial runs:


A whole lot of glue:


And sanding:


And, then I had the table top:

And, then I had legs:


 And, finally, a table!  The legs aren't as beautiful (nor are they as neatly done!) as the inspiration table's legs, but they are still sleek and pretty.


After adding a lot of support to the bottom of the table and legs, it was ready for the staining to begin.  The Docs wanted a finish that was a little more brown than the old table (that was a gray-brown).  Since the original table was built, they've added a few mid-century pieces to the mix.  This table sits adjacent to their more modern style living room pieces - the color of which is a warm reddish brown.
So, finishing went like this:

  1. Apply Minwax golden oak stain, let dry overnight.
  2. Sand off most of the golden oak.
  3. Apply Minwax weathered oak stain, let dry overnight.
  4. Sand off most of the weathered oak stain.
  5. Apply another coat of Minwax golden oak stain, let dry overnight.
  6. Sand off most of that stain.
  7. Wipe off fine dust with damp cloth, let dry.
  8. Apply coat of polyurethane, satin finish, and let dry overnight.
  9. Lightly sand and wipe clean
  10. Apply coat of polyurethane, satin finish, and let dry overnight.
  11. Lightly sand and wipe clean.
  12. Apply coat of polyurethane, satin finish, and let dry 2 hours.
  13. Apply coat of polyurethane, satin finish, and let dry overnight.
  14. Lightly sand and wipe clean.
  15. Apply coat of polyurethane, satin finish and let dry 2 hours.
  16. Apply coat of polyurethane, satin finish and let dry.
  17. DONE!!!
Then, build bench and finish as above!  (did reduce the number of coats of poly to 3! - call me lazy!)

I delivered the table and bench today, Father's Day.  


They are very happy with it.  The table is a good mix of their rustic and modern style, is sturdy - DIL Doc can dance on the table if she wants, and it's big enough to easily sit 8 - 10 with room for serving platters on the table!  I'm happy to have challenged myself and followed through to the finish - the math for this one had me wishing I'd paid more attention to geometry in high school (well, in grade school, too - even a better understanding at that level would have helped!!)  And, I made sure that every inch of this sucker has been sanded smooth - so,  Little Doc can crawl and stand around this table without worry of splinters.

I'm looking forward to dinner at the Docs!