Pages

Monday, September 2, 2013

Vacation ready, Check!


I don't know about you, but before I leave the house for an extended length of time, I need to have things picked up, put away and somewhat organized.  I need clean sheets on the beds, the dishwasher empty, the laundry done.  As much as I enjoy vacations, I love coming home to a clean home.

And, I'm going on vacation!  I'll be leaving soon, taking a cruise through the inside passage of Alaska.  I can't wait.  But, this meant that this holiday weekend was spent doing everything I've already mentioned, and because my garage is now so much a part of my life, it meant that I had to get that space cleaned and organized, too!


So, first off, a couple of quick projects to complete and move out of the garage.

My sweet sis showed up at our recent family lunch/swim party with a sad looking kitchen drawer.  Thankfully, her old cabinets are pretty well made and the fix was simple.  A new back piece and it was good as new.  Done & delivered.

The next project took a bit more time and effort.  And, finishing.  Geez, I wish I could get away from that part of the work.  It seems I'm as bad as Don in this regard - I just can't say no.  I tell people I'm not a pro, that it may not be the best job, blah, blah, blah - and still they plead, "please stain it for us".  What am I do to??

So, my young designer friend had a friend/client who wanted a hall tree.  This one:
There were a couple of problems.  First, they saw this on-line and would need to wait for delivery and then they'd have to put it together.  Also, the price ranged from $300 to $500.  The materials were some wood & some MDF.  So, the question was asked "Can you make this".  Well, sure I could make it (I was pretty sure I could figure it out...), but I did tell them I wouldn't finish it, that I wouldn't include the cushion, that I'd charge them $300, and it would still be a few weeks before I could complete it.


 The result - Close.  (and yes, I really did add final touch ups to this piece in my favorite red jeans and and a cream colored top - what was I thinking!!??  Thankfully, no stain or glue found its way onto me!)


First the mirror.  A call to Tradeway Glass Company on Badillo in Covina and my mirror was ready that afternoon!  Very reasonable, wonderful service.  I vaguely recall that Don had business dealings with Tradeway, way back when.  I chose to shorten the mirror - I saw that long mirror as an accident waiting to happen.  Can you just see it?  Toss your purse with keys, or maybe a laptop or tablet and, wham!  broken glass all over the place.

Then the cushion, designer friend found a large slab of foam at Home Depot for a very reasonable price, so I decided to make a cushion.  A yard of fabric from Joanne's and it was done.

And, yes, I finished it.  Is it perfect?  No.  But, it did look nice.  Minwax Dark Walnut stain, 3 coats to get the dark, rich color, then 2 coats of rub on polyurethane in a satin finish, then a final coat of carnuba wax.

Done and picked up on Saturday morning.

Most projects are now out of my garage.

The rest of the weekend was spent on cleaning up and making things more workable.

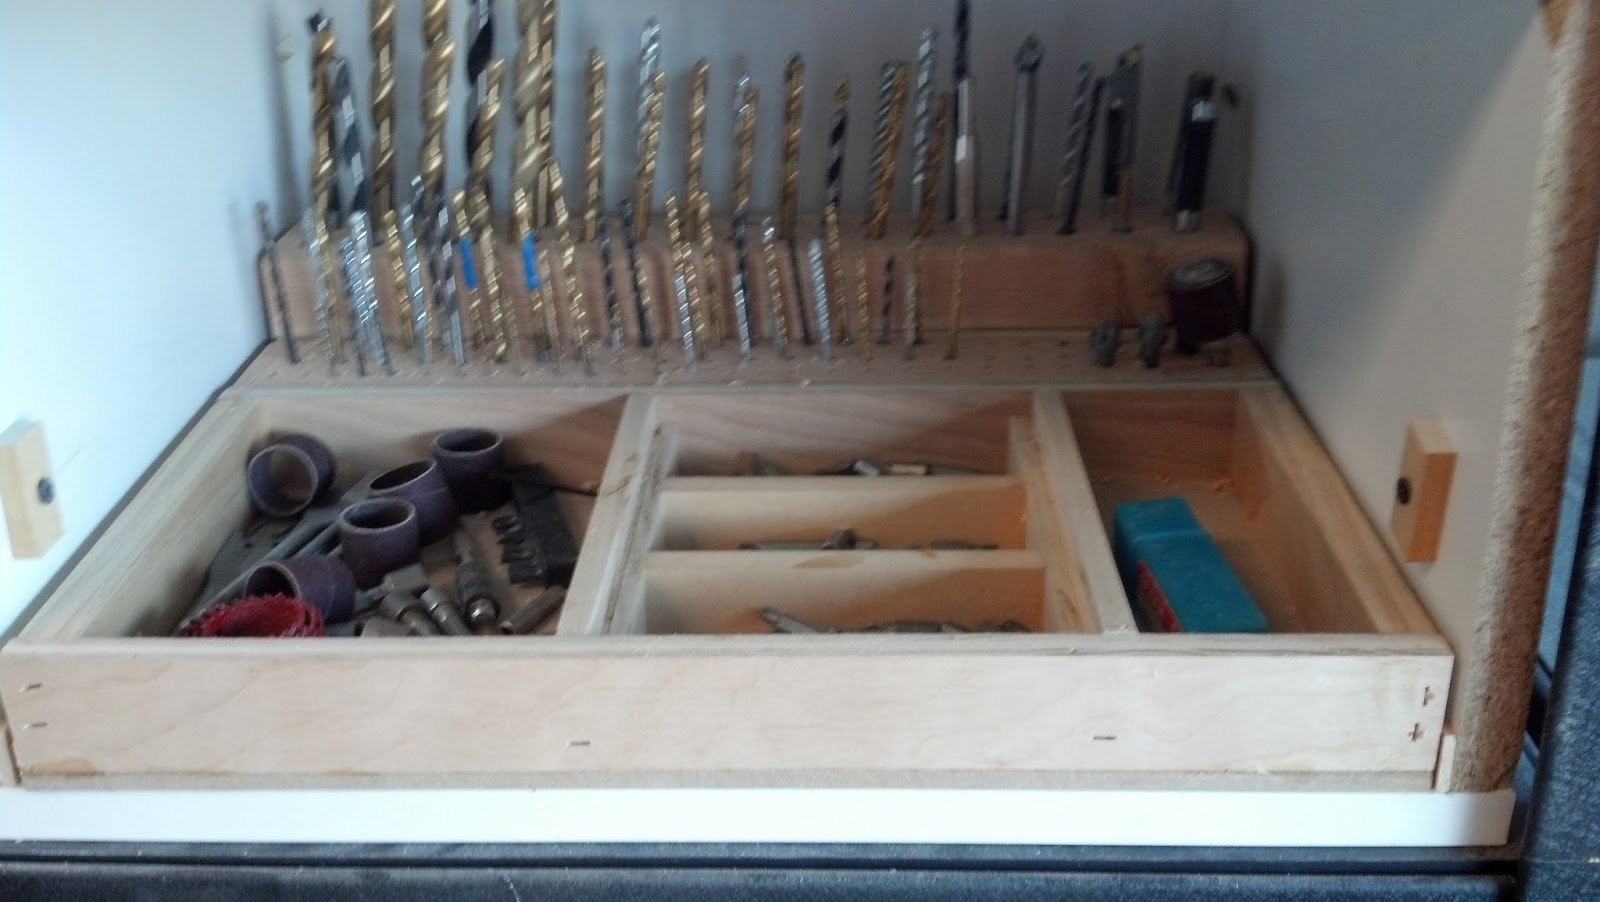
I have a bunch of drill bits and drivers.  You can buy these things individually, but it is often more economical to purchase them in sets.  You can get small sets and large sets
14-Piece Black Oxide Drill Bit Set
small set
 
Ryobi Drill and Drive Bit Set (106-Piece)
LARGE set

I had a couple of large sets, and a couple of small sets.  Pretty much, I use a basic Phillip's and pocket hole square tip drivers.  As for drill bits, I do go through a lot of the smaller sized one.  I have used, on occasion, the large sizes, but that doesn't happen often.  Having all of these in these plastic cases made it time consuming to get to them, and really, does anyone put them back into those little snap in compartments?  I sure didn't have time or patience to do that.  So, they ended up a big mess, that took up a lot of space on my shelves.

I went from these plastic encased sets:


To this    


Next up, my router table.  Yes, I have a router table, and I have 4 routers.  I love the router, but I hate using it. It's very powerful and really scary!  I need to work on using the router table as routinely as I use the table saw.  But, the set up wasn't the best.  Just a big box that didn't move or store anything. It was really inconvenient to use. So, I went from the big box to this:

First, a drawer and a shelf.  


And, I used those expensive Euro guides.  I got the set for $4.00 from the Habitat for Humanity reStore store,
Azusa ReStore
410 South Irwindale Avenue, Azusa CA  91702
Then I added casters, the front 2 are locking.

I used peg board to clad the sides.  I'm not sure what I might store there, but I'm sure I'll think of something!
 Next,  storage for my nailers.
I have a pin nailer, a nailer, and a stapler.  They were always in a jumble sitting right next to the air compressor.  
In these pictures you can see the simple box I made that provides space to hold each gun - these are expensive tools and I figured I should really treat them a bit better than just tossing them in a pile with all the rest.
  

There you have it.  In addition to a clean house (everything clean at the same time - aaaahhhh!), now in my garage there is a place for most things, and most things in their place.  All swept and a ton of saw dust blown off everything!  The recycle bin is full and already sitting at the curb.  I won't be building anything until I'm back from vacation, but when I'm back and open the garage door, I'll be ready to get to work in my newly organized and clean workshop!

Alaska, here I come - well, very, very soon!

Monday, July 29, 2013

Legal Shmegal...


I forget that I'm getting old, and that I get tired, and that I'd be better off doing things that I can start and finish within a couple of days.  Remember the kitchen I did last year??  I'd started it and by God I was going to finish it.  And, as happy as I was to do it for Camper kids, it pretty much did me in!  I decided I wouldn't do another job as big as that one.

Weeeeeelllllllll, this job for Legal Doc was almost as big as that kitchen!  Not as many doors and drawers, but still, a lot of pieces.  And, I did the finishing work - which I hate and talked a little bit about in the last post.

Here's the deal.  Legal Doc has a small office in La Verne.  He meets clients there, he does his research and legal work there.  It was a hodge-podge of mis-matched furniture.  A huge desk from my house, a sofa and coffee table from their house, some old bookcases and shelving.  It wasn't very aesthetically pleasing and it was crowded and kind of dysfunctional.  So, Legal Doc sent me a drawing of what he'd like in there and asked me I wanted to build it for him.  I'd just finished a small job and didn't have anything else to do so I said I would love to build it for him.  And, although it was a big job and I've done a lot of whining about all the finishing, I'm really happy that I was able to do this.  Hopefully, he will be happy with how it turned out and find it functional and pleasing to look at while he's working.

His plan was to get rid of everything in there.  He wanted a small conference table to replace the sofa and coffee table.  He wanted a desk without a return and open space under the desk (he has long legs and lots of computer stuff that he wanted to fit under the desk.  All he wanted was a sliding keyboard tray.  I suggested that he have a couple of small pencil-type drawers on either side of the keyboard drawer.  He wanted an L-shaped credenza - his file cabinets would sit under the long part of the L, and the short part would be a cabinet with doors to store some of his more unsightly things - maybe even his printer.

Now, I don't look at things like a real carpenter or cabinet maker.  My brain goes into overdrive when I try to figure out how to build something.  I usually miss the obvious, normal way, and find some backwards, difficult way to do it - that's just the way I am!  So, I thought, "hmmm, this has to be carried up two flights of stairs and these are big pieces, they should be built in pieces so they can be easily carried up the stairs and put together in the office".  And, I thought "wouldn't it be nice if these pieces could be reused in another location, so make sure all sides have finished edges and can be used in other ways than they are in this office".  How hard could that be??  Because this is me, and my weird brain was at work here, turned out to be hard!  And, it was a challenge.  Sort of an "ah ha" moment came over me at one point, and this turned out to be much easier than I tried to make it!!

So, from start to finish:

I used PureBond Birch plywood.  I do like this stuff, it's usually pretty clear, straight, and it's made in America.  To be honest though, some of the sheets I bought for this were not as nice as usual.  
Here's the conference table top (below) - I thought I'd sanded through the ply but turns out there were several places where the top ply was so thin that the stain didn't take well.
I had to buy another sheet of plywood to remake the top.


Desk top waiting for edging.
Clamping 3/4" birch edging to tops.
Desk top ready for stain.

Desk front panel.  The top has a 6" overhang on this side-that's not huge but will
 give people a bit of room to "pull up" to the desk.
Long credenza base - 2 file cabinets will fit under this.

 Finishing in the works

I have to be honest, when the first coat of stain when on, I was disappointed.  I wanted a dark espresso finish and all I got was a blotchy mess.  After 2 coats I didn't think it was much better!  I called Legal Doc and asked him to come look at it an tell me if he wanted me to continue or if he wanted me to paint it.

He came over.  He wasn't feeling well and I think that influenced how he looked at it.  He said it looked fine to him and to just go ahead and keep staining!  He just wanted to go home and go to bed, so I don't think he really saw it.  But, I'd been given the go ahead, so that's what I did (after several more days of procrastination!)

Below you can see that I had pieces all over my garage!  And, I even used the truck tail gate!  It sprinkled this day and I had the back end backed almost into the garage.  I had to put a piece of lumber across the top of the truck bed, too, to keep the rain off those pieces drying there.  I also used the trash can to hold a large side piece.

In this picture you can see that my saw table held several small pieces, too.  I had large pieces on top of the cabinet base, on saw horses, and drying on top of another project that was sitting on the garage floor.

The End Result
  

 Table top - I finally got a nice deep rich looking espresso finish.
Plenty of pretty highlights, but nothing that looks washed out.


About 3 coats of Minwax Espresso stain and 2-3 coats of Minwax wipe on polyurethane in satin.
You can't really tell, but there are at least 12 pieces stacked here, one of the top and the keyboard drawer aren't shown!
To recap:  
Square Conference table
Credenza - 72" Long L top
Credenza - 58" Short L top
Credenza - 64" Long base
Credenza - 36" short base cabinet w/2 doors
72" Desk with privacy panel, 42" keyboard drawer and two additional "pencil" drawers + 72" top

My garage is full!
Will post pictures next week when they are installed.
Now I just have to remember how they all go together - wish me luck on that score!