Pages

Saturday, November 30, 2013

Remember your first real home?

I do, it was an older, Spanish style "2 on a lot".  Don couldn't wait to get started tearing that house apart!  That was the beginning of our "buy a house, remodel it, sell it, buy another house to remodel" odyssey.

My son and daughter-in-law, the Docs, just recently purchased what they hope to be their "forever" home.  It's large, beautiful inside and out, and really, really wasn't even close to a fixer-upper - he wanted something finished! I can't think where Don and I went wrong with this kid. :-)

I wanted to give them a housewarming gift that they actually needed, not just wanted.  Since this new home is so much larger than their condo, with lots more rooms to fill, it was pretty easy to come up with something they needed - a dining room table.  Doctor Doc had been sending me pictures of some beautiful rustic tables, so finding something they wanted turned out to be easy, too!   She really liked this one from Pottery Barn.  It's rustic, but "refined", too!

Benchwright Reclaimed Wood Extending Dining Table - Wax Pine finish

My sis and I took a trip to PB and I crawled all around and under this table!  Bless her heart, she was not even the teensiest bit embarrassed!  The table was nice to look at, but the reclaimed pine top was actually pretty rough.  I'd be afraid someone could get splinters!  And, it was rickety.  And, the price started at $1200!  But, I thought I could make something very close to it in appearance, the finish, on the other hand, was something I figured I'd end up struggling with.

I found a plan for the table at Ana-white.com (great place for fairly easy to follow plans for all kinds of things!).  So, I was set (just already worrying about the finish!).  As luck would have it, I came across a finish that both the Docs liked - weathered but finished looking.  Where else, but on Ana's site - thank you Jen Woodhouse of House of Wood


Here's how it went:  First the legs and base

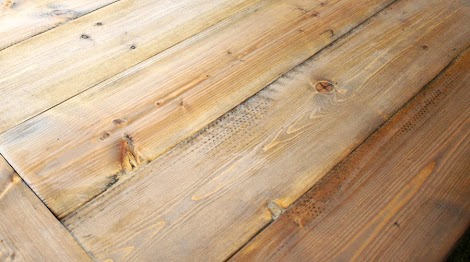
Then, I joined the boards for the table top.
  

Then, I made sure it was all going to fit together the way I anticipated!  And, it did - whew!!!


Then, I drilled all the areas where the bolts would be added.  I improvised on the "iron" pieces - using a mixture of electrical pieces.  Camping daughter told me after it was finished that she was really worried I'd lost all sense when I told her what I was using for the cross pieces that would make it look more like the PB table - she was very relieved - and surprised - when she saw the finished table!

 And, then I did it all over again, just on a smaller scale.  The Docs will be adding 4 chairs, but wanted a long bench for seating, too.


And, now for the finish!  All 9 layers of it!
1 and 2.  Conditioner applied - twice! First coat absorbed and somewhat dry, then added another coat but didn't wait for it to dry completely before beginning staining!
 Really makes a difference in how the stain is absorbed.
I'm usually too lazy to use it and then am not happy with the end result!

3. First stain - Special Walnut
4. Second stain - Weathered Oak
5. Whitewashed - Brush on, wipe, wipe, wipe, wipe off! 
6.  Mixed stains (Special Walnut and Weathered Oak)


7, 8, 9.  three coats of Spar satin urethane are applied to all surfaces.


And, then, finally - the table, the bench and both bases are completed!  Each application of finish material took about an hour and a half, and because I really wanted this finish to be perfect, I took my time between steps and let each layer dry overnight.  It was so hard for me to wait, but I'm so glad I did.  I love how this turned out, I think it will serve them well, and it's solid enough that it should last for a long while.  And, when they move on to a different style, it might still work in their back yard.  At least until they're ready to burn it!

Here it is - in their new home!  


Photo

Welcome home, Docs.  I wish you many happy years in your new home! 
(and at least one little baby to pound holes into the table top!)
Love you lots!


Happy Thanksgiving!

Thanksgiving has always been my favorite holiday - no shopping, no gifts, no nothin' but family and friends and food.

This year was really special for me.  All of my kids and their kids were together on the actual holiday!  My sis and her little guy spent the day with us, too.  It was wild and crazy here, but so much fun!  The boys turned sticks into baseball bats, the girls made a mortar and pestle out of wood scraps and mixed up some kind of potion.  All the ladies had their nails done by Miss KK.  There was a game of cribbage going on, and we ate and ate.

Perfect holiday!

And, a couple of days prior to Thanksgiving I found something I've been wanting for awhile.  Well, something close to what I've been hankering for.  What I've dreamed of having in my kitchen is a well-used chopping block.  One that's cut from a beautiful piece of wood, worn down in the center from constant use as food is lovingly made for the family.  What a conversation piece that would be, right?

Well, I didn't get that exactly, but I made an impromptu stop at a garage sale at the end of my street.  And I found this big block on legs with casters. It wasn't pretty, but it was a chopping block and it was big - and it was $5.  Of course I bought it!  Then, I sent the boys down the street to roll it home for me.  I thought they'd have fun rolling this big thing down the street - they did, too, until it toppled over and landed on RyRy's big toe - poor thing.  The doctor isn't sure, it could be broken or just badly bruised.  In either case, it hurts.  But, he's been a trooper about it - only wincing a few times when they were all playing!

I should have gotten a picture of it as it was when I got it.  But, I was so anxious to get the legs off of it and start sanding it down that I didn't.  Here it is though, in pieces!

Isn't that leg ugly???  And, the block itself was dingy and gunky.
Here it is after I'd sanded it with my orbital sander.  Looking better, but still sticky.  I think I went through 10 sanding discs just to get it to this point!

And, then Logger SIL came up behind me and very nicely asked me if something was wrong with my belt sander.  When I told him not a thing was wrong with it, that I just avoided using it because it's big, heavy, and too fast for me to handle, he offered to take over the sanding for me!  What a difference it made!  He got that sucker down to bare wood.

Then we oohed and aahed, and scratched our heads wondering what kind of wood it was - well, he did.  He thinks about those kinds of things. I just basically oohed and aahed!  It was so pretty.  And, it was stamped on the inside that it was made in Indonesia, so I'm thinking it's some kind of hardwood from that part of the world.


And, voila!
Here it is in my kitchen.  I'll have to get used to moving around it, but it fits nicely with room to open cabinet doors and oven and refrigerator doors.  It's a good height for chopping.  Logger SIL says I can work on a shallow indentation only - this isn't a solid block, just made to look solid.  The wood, whatever it is, is just over an inch thick all around and it's heavy!

This is the block with a coat of food safe mineral oil rubbed into it.
It took on a rich, warm, almost cherry-wood color.
I hated the legs, but at $5 it was a bargain and I figured I'd just use it as-is, sort of.
I did sand the legs and stain them to match the block.


 I'm pretty darned pleased with my $5 purchase. 
 It looks so pretty in my kitchen - almost too pretty to chop on!

What do you think - are you tempted to get out to more garage sales??