Pages

Tuesday, October 15, 2013

A new look for my entryway...


Hey there!  Let's see if I can even remember how to publish a post!  It's been way too long!

My vacation to Alaska was fantastic, by the way.  I was gone for about 10 days, then back to work - which is hectic these days since the students are back on campus!  Then, I managed a visit with friends on a Saturday, dinner on a Sunday, another drive one Saturday to visit my sister - just seems like I've had "stuff" to do that kept me from working in the garage.  Then, there was the fact that it was clean when I left for Alaska.  I like clean, almost as much as I like running wood through the saw and creating tons of sawdust!

Finally, two weekends ago running wood through the saw won and I managed to get back to work - ahhhhhh.  It did feel good to be producing something again.  I wasn't sure what I was going to make, I just wanted to do something.  As I was putting out my meager supply of Fall/Halloween decorations I realized that my entry was getting pretty scraggly looking.  The concrete in that area is ugly - I'm not planning to try to do anything with that, but I did think that if I dug up my big jasmine bushes and planted them in large planters I might be able to cover up a bit of the cracked and ugly concrete!

I measured up the space and headed off to HD where I picked up lots of cedar fence posts.

 5/8 in. x 5-1/2 in. x 6 ft. #2&Btr No Hole Incense Cedar Dog Ear Picket
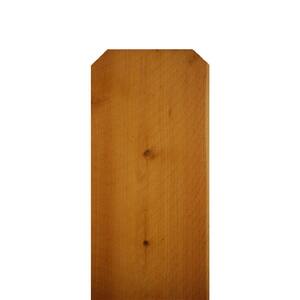
$2.05 / piece       5/8 in. x 5-1/2  in. x 6 ft. #2&Btr
No Hole Incense Cedar
Dog Ear Picket

These things are pretty cheap, and they hold up to the weather really well - that's what fence posts are supposed to do.  I bought a bunch of them (about 20 of them) and figured that would do the trick.  Well, you know my measuring skills are sadly lacking, and I ended up having to go back for about the same number of boards.

Turns out that my planters were large enough that they could have been used for small coffins (just keeping with the Fall/Halloween theme)!  I walked out to the entryway, double checked my measurements and wondered if I was going to be really, really sorry that I'd started this project!
These things are 36" wide, 33" long and 29" tall.


This past weekend I figured I was going to finish this project up and just live with it, regardless of whether they were too big and disproportionately sized for the space.

So, out came the primer and paint.  I wish I'd taken a picture of the primer I used (and the paint wasn't much better)!  It was old, from when we painted the house - so, 6 years old at least.  The can was rusted and the lid was caked with rust.  Miraculously, the paint wasn't "spoiled"!  Clumpy, but not sour smelling or ugly looking.  After stirring and stirring and stirring and, well you get the picture - I had a somewhat smooth product and was able to get it primed and painted.  I used a semi-gloss exterior paint for the final two coats. I painted just the top 6 inches of the interior and covered the inside with gardening cloth that I poked all kinds of holes in for drainage purposes.  


Then it was time to dig up my jasmine and put the boxes in place.  Oh, my - I haven't dug in the garden in ages and gosh did it wear me out!!  I do forget that I'm not 29 anymore!  I had just enough energy to fix something for dinner and head to bed - hoping that my uprooted jasmine would make it through the night and next day until I could pick up some potting soil and get them potted!

Monday, we made a stop at HD after work and picked up bags and bags-12 bags in fact, of potting soil!!! I did only use 8 bags, but figure I'll need to add more as the soil settles.
Kellogg Patio Plus 1.5 cu. ft. All-Natural Outdoor Potting Soil

And, here's the result.  I'm doubtful that the jasmine plants will survive - especially the plant on the left of the door, but for now I'm trying to keep them alive and flourishing.  The planters do what I'd hoped they would, and disguise some of the imperfections in the concrete.   They seem to widen the entry area, too.  All in all, I like the planters and the new look!  What do you think?  


Monday, September 2, 2013

Vacation ready, Check!


I don't know about you, but before I leave the house for an extended length of time, I need to have things picked up, put away and somewhat organized.  I need clean sheets on the beds, the dishwasher empty, the laundry done.  As much as I enjoy vacations, I love coming home to a clean home.

And, I'm going on vacation!  I'll be leaving soon, taking a cruise through the inside passage of Alaska.  I can't wait.  But, this meant that this holiday weekend was spent doing everything I've already mentioned, and because my garage is now so much a part of my life, it meant that I had to get that space cleaned and organized, too!


So, first off, a couple of quick projects to complete and move out of the garage.

My sweet sis showed up at our recent family lunch/swim party with a sad looking kitchen drawer.  Thankfully, her old cabinets are pretty well made and the fix was simple.  A new back piece and it was good as new.  Done & delivered.

The next project took a bit more time and effort.  And, finishing.  Geez, I wish I could get away from that part of the work.  It seems I'm as bad as Don in this regard - I just can't say no.  I tell people I'm not a pro, that it may not be the best job, blah, blah, blah - and still they plead, "please stain it for us".  What am I do to??

So, my young designer friend had a friend/client who wanted a hall tree.  This one:
There were a couple of problems.  First, they saw this on-line and would need to wait for delivery and then they'd have to put it together.  Also, the price ranged from $300 to $500.  The materials were some wood & some MDF.  So, the question was asked "Can you make this".  Well, sure I could make it (I was pretty sure I could figure it out...), but I did tell them I wouldn't finish it, that I wouldn't include the cushion, that I'd charge them $300, and it would still be a few weeks before I could complete it.


 The result - Close.  (and yes, I really did add final touch ups to this piece in my favorite red jeans and and a cream colored top - what was I thinking!!??  Thankfully, no stain or glue found its way onto me!)


First the mirror.  A call to Tradeway Glass Company on Badillo in Covina and my mirror was ready that afternoon!  Very reasonable, wonderful service.  I vaguely recall that Don had business dealings with Tradeway, way back when.  I chose to shorten the mirror - I saw that long mirror as an accident waiting to happen.  Can you just see it?  Toss your purse with keys, or maybe a laptop or tablet and, wham!  broken glass all over the place.

Then the cushion, designer friend found a large slab of foam at Home Depot for a very reasonable price, so I decided to make a cushion.  A yard of fabric from Joanne's and it was done.

And, yes, I finished it.  Is it perfect?  No.  But, it did look nice.  Minwax Dark Walnut stain, 3 coats to get the dark, rich color, then 2 coats of rub on polyurethane in a satin finish, then a final coat of carnuba wax.

Done and picked up on Saturday morning.

Most projects are now out of my garage.

The rest of the weekend was spent on cleaning up and making things more workable.

I have a bunch of drill bits and drivers.  You can buy these things individually, but it is often more economical to purchase them in sets.  You can get small sets and large sets
14-Piece Black Oxide Drill Bit Set
small set
 
Ryobi Drill and Drive Bit Set (106-Piece)
LARGE set

I had a couple of large sets, and a couple of small sets.  Pretty much, I use a basic Phillip's and pocket hole square tip drivers.  As for drill bits, I do go through a lot of the smaller sized one.  I have used, on occasion, the large sizes, but that doesn't happen often.  Having all of these in these plastic cases made it time consuming to get to them, and really, does anyone put them back into those little snap in compartments?  I sure didn't have time or patience to do that.  So, they ended up a big mess, that took up a lot of space on my shelves.

I went from these plastic encased sets:


To this    


Next up, my router table.  Yes, I have a router table, and I have 4 routers.  I love the router, but I hate using it. It's very powerful and really scary!  I need to work on using the router table as routinely as I use the table saw.  But, the set up wasn't the best.  Just a big box that didn't move or store anything. It was really inconvenient to use. So, I went from the big box to this:

First, a drawer and a shelf.  


And, I used those expensive Euro guides.  I got the set for $4.00 from the Habitat for Humanity reStore store,
Azusa ReStore
410 South Irwindale Avenue, Azusa CA  91702
Then I added casters, the front 2 are locking.

I used peg board to clad the sides.  I'm not sure what I might store there, but I'm sure I'll think of something!
 Next,  storage for my nailers.
I have a pin nailer, a nailer, and a stapler.  They were always in a jumble sitting right next to the air compressor.  
In these pictures you can see the simple box I made that provides space to hold each gun - these are expensive tools and I figured I should really treat them a bit better than just tossing them in a pile with all the rest.
  

There you have it.  In addition to a clean house (everything clean at the same time - aaaahhhh!), now in my garage there is a place for most things, and most things in their place.  All swept and a ton of saw dust blown off everything!  The recycle bin is full and already sitting at the curb.  I won't be building anything until I'm back from vacation, but when I'm back and open the garage door, I'll be ready to get to work in my newly organized and clean workshop!

Alaska, here I come - well, very, very soon!