Pages

Thursday, November 29, 2018

Tables Finished!

Hey there, remember last post I mentioned I was making two massive coffee tables for the Doc's in-laws?  And, that I hoped it would look somewhat like this?


Well, here they are finished.  I hope I'll have a picture or two to post once they are delivered and put in their planned places.  But, I think they are very close to their inspiration picture, and right now, I'm really happy with them.


Wood bases (2x8's cut to size 2x2, milled down, sanded, filled and sanded again-I only got two long pieces out of each section of 2x8; there was so much waste!)

Primed with Rustoleum black primer; three coats of Rustoleum black satin, two coats of Varathane satin polyurethane.

Table top is 1x3s cut to size, placed within a frame of 2x4, on the diagonal in 4 sections. All of it is glued onto a 1/2" plywood based.  Then, the top was flipped and screws were run through the plywood into each of the boards in at least two places.  The pine boards were then stained in different base colors (Varathane summer oak, Varathene basic gray, Minwax Early American, and Minwax Ebony, and Varathane weatherizer).  Sanded, filled, sanded, more stain, more sanding, more stain, more sanding until they looked old and weathered enough!  The edge trim is Minwax Ipswich pine and it went through the whole aging process with the rest of the table!

Finally, the tops received 4 coats of Varathane Satin Polyurethane.

The tops will be screwed on from the bottom of the top rails of the base.

These were another fun project.  But, I think this weekend it's time to move them to their new home!

UPDATE:  Photos of tables in their new home


Monday, October 29, 2018

It's Fall!!

Well, here we are again at the beginning of Fall.  This past summer was a scorcher, so I'm happy to welcome this season.  Happy for the cooler weather, and happy to work without sweat running into my eyes.  And, happy that there is work waiting for me to start!

Coming up, I'll be making two huge coffee tables for the Doc's other parents, Angie and Albert.  They have a huge new home with a massive sectional in the family room.  Originally, they wanted a table that was 54" wide by 104" long!  Can you imagine the walk you'd have to take to refill your wine glass???  I asked them to consider two smaller tables instead so that movement around the sofa/table area was not so restricted.  They did, and decided to go with two smaller tables at 44" x 44" square.  Hopefully, they will look something like this:


And, I'll be making a dog bed for little Penny Rose, the Doc's dog.

It should look like this:


Keep your fingers crossed that I can actually get them close!

I'm also going to be fixing and refinishing this hutch that once belonged to my Aunt Shirley.  When she passed away, I was able to take this hutch for my Logger Daughter.  It worked well in their tiny house.  Then they remodeled that house and it still worked well, but out in the garage as a secondary pantry area.  After that, it moved with them to their current home and became an entertainment center for their daughter's room.  I had to cut out a center shelf and cut a hole into the back.  Now, I'll be fixing it for my sis, who loves farmhouse type, sturdy, pretty, old looking (or old) furniture.  This will be great along side the pieces I've built for her.  


Summer Recap - 2018

It was a busy, hot, hot, hot summer.  I sweated more this year than I have in my whole life - not kidding!  Temps hovered in the triple digits most days and evenings didn't cool off until, well they didn't cool down!  The AC ran all day long.  And, there is no AC in the garage - so, the sweat thing...

But, I did start and finish lots of projects.  These may not be in the order in which I finished them, but I think I've remembered most of what I did.

First, I worked on my living space.  I switched colors and had to do lots of things to make things work.  The pictures for the biggest part of that change were in an earlier post.  Since that time, I reupholstered my dining room chairs and made a new table cover.  I also made a new entry table.  I'm happy with how everything turned out, and I especially love the entry table.  I've avoided colors for so long and it's such a refreshing change to see one of my favorite colors on the walls and in the furniture.  So, not a bunch of pics but here's the result. (And, I'm not sure why these are videos!!)

Entry table:  I love, love, love this.  I have room in those drawers for all my glasses and keys!


Dining Chairs


These didn't turn out as tight fitting as the side chairs; I had to turn the fabric around in order to have enough for the 2 end chairs.  It's more noticeable in this picture than when you're sitting on it!

The table cover is the same fabric and looks great.  

Next, my sister commissioned me to create new bedroom furniture.  
She's been making due with a small dresser and night stands.  Sometimes I'd find her sitting on the floor working on things because she could plug her phone charger in only that area.  She had a metal file cabinet, and several plastic drawer bins holding personal papers and school supplies.   It was a mess.  So, we brainstormed on what she needed to contain her clothing, personal important documents, her son's school papers, and desk space.   Then I designed pieces that gave her room for everything, and looked pretty in her room.  She bought a new small recliner, new bedding and some art work, reconfigured and painted her jewelry box, I redid the lighting fixtures, and now she has a beautiful, soothing space to spend some alone time.  Light, soft gray dresser, file cabinet, desk, night stands.  Simple but soothing and spacious.  The light fixtures went from rustic bronze to silver tones. The gold/yellow color of the jewelry box brings out the golds in the artwork.  This room now functions.  She loves it, and I'm happy she has a nice space to get away from me when she needs to!!


I wish I were a better photographer, because she really did a nice job with colors and accessories, and it's such a pretty room now.  

Another project I enjoyed was making this coffee bar/counter for a family that saw something similar at a garage sale my sis and I had.  He called me a few days after he'd see it and said he'd loved the top and wanted one in his home.  It turned out great.  I do love these rustic herringbone counters.  The picture of the top is similar to what he has.


I spent some time up at Logger Daughter's and built some additional laundry cabinets for her.  One, small change covered up the opening behind the washer/dryer and gave her space to store laundry items within reach.  (she's only 5" tall when she stretches so this was an important change!)

The other cabinets were added in the mud room area of the laundry room.  I showed my very early blond roots when I made the tall broom closet for this area by mis-measuring one side of the cabinet and not catching it until installation.  Boy was it wonky.  But, I kept thinking it was the wall of their old home that must be way out of plumb.  Nope, after beating it into submission and screwing it in as close to level and plumb as I could get it, I remeasured and discovered I was out by at least an inch!  But, the darned thing was in and held her broom and vacuum so I left it and said I'd cover it up with the doors.  I had to leave it for 2-1/2 months though so I worried and fussed about it the whole time.  I made the doors for it here at home, then worried that I'd measured those wrong. The doors are made from hickory, with hickory plywood center panel.  The outside edge of the door has the same coved edge as her kitchen cabinets, so you really don't notice that they are not raised panel. It was a relief to install them and find they fit, and that I could actually cover up the bulk of my mistake.  Years after I'm gone they'll reach into that cupboard and remember that I didn't have a lot of skill, but I did my best for them!!

You can see at the top just how crazy this cabinet is!

And, here!


The doors on the big cabinet fit and saved me from having to try to rebuild that sucker!  It works.  

There's more, but this post is way too long as it is.  
Happy end of summer!!

Thursday, July 19, 2018

Making things for me! and getting closer to finishing my living room changes

One more thing for my “new” living room!  I’d found this beautiful canvas of an old world map and it was perfect for my new color scheme. But, it looked kind of puny on the wall.


 I found some old boards that I’d salvaged from a man who had saved every piece of wood that he had taken out of his home of over 50 years.  He and his wife were downsizing and needed to clear out his stash of old lumber and they called me to come get what I wanted!  SCORE!

Here's my map now.  Much better, I think. 


Oh, and I'm going to eventually, build a new fireplace surround for my electric fireplace.  And, I found these great chairs at my favorite thrift store for $75 each.  They are big and comfy, but fit me nicely. 

Next, to recover dining chairs, make the covering for the round table, and I'm making a new entry console so that I have some place to keep my gazillion pairs of glasses, and all the keys I have!  I have a beautiful new mirror in the entry, but I'm going to wait to show that until the console is finished! 

I hope you're enjoying summer - it's been hot and muggy here, but I love summertime!


Those Green Chairs...and other updates at the Logger's home

My green chairs have found a new home!  I loaded them up in my truck last week and delivered them to Logger Daughter.  They look great in her new kitchen/dining/bar/ sitting area.  These chairs were 15 years ago at a hotel furniture resale place.  I paid $35 for both chairs and $15 for the ottoman.  I think I paid $3 a yard for the upholstery fabric and for about $75 I had these great chairs.  I've had them in my living room, family room bedroom.  And, way back when I made those slipcovers, I recall that it was a simple thing to do.  (unlike the chairs I just made slip covers for - I'm way too old to be crawling around on the floor measuring these things and sitting for hours at a sewing machine!)  I'm happy they're still in the family and have found a home where they'll be well used. 


Here are some of the other things I did during this quick visit.

 Added some cute wood signs that were a gift from her cousin to her entryway wall.


Made and installed a large (42x42) chalk/cork/magnet board.  I think the ornate, painted frame is such a fun thing in her kitchen.


With some help from my granddaughters (All I did was cut the board and paint it white!) we created a huge Farmhouse sign for above her refrigerator and new chalk board.  


Hung some stuff above their temporary bar area - Logger SIL has a special piece of walnut that he wants to use as a bar top, and of course, he'd like a larger bar, too!
They had the mirror and clock, but I made the little "wine" sign to balance things out.  


When I was there in August I had built one shelf above her washer/dryer.  I knew then that I wanted to add another one higher up, and that I wanted something that would cover the top of the dryer (and maybe close off the opening to "sock hell" behind the dryer.  So, I found enough material to give them much more usable storage in that area.


And, THIS!  
I'm embarrassed to include this in my list of projects, but the whole purpose of this blog is to document the things I build - not just the things that turn out well, but even the things with flaws.  And, this one had/has a major flaw.

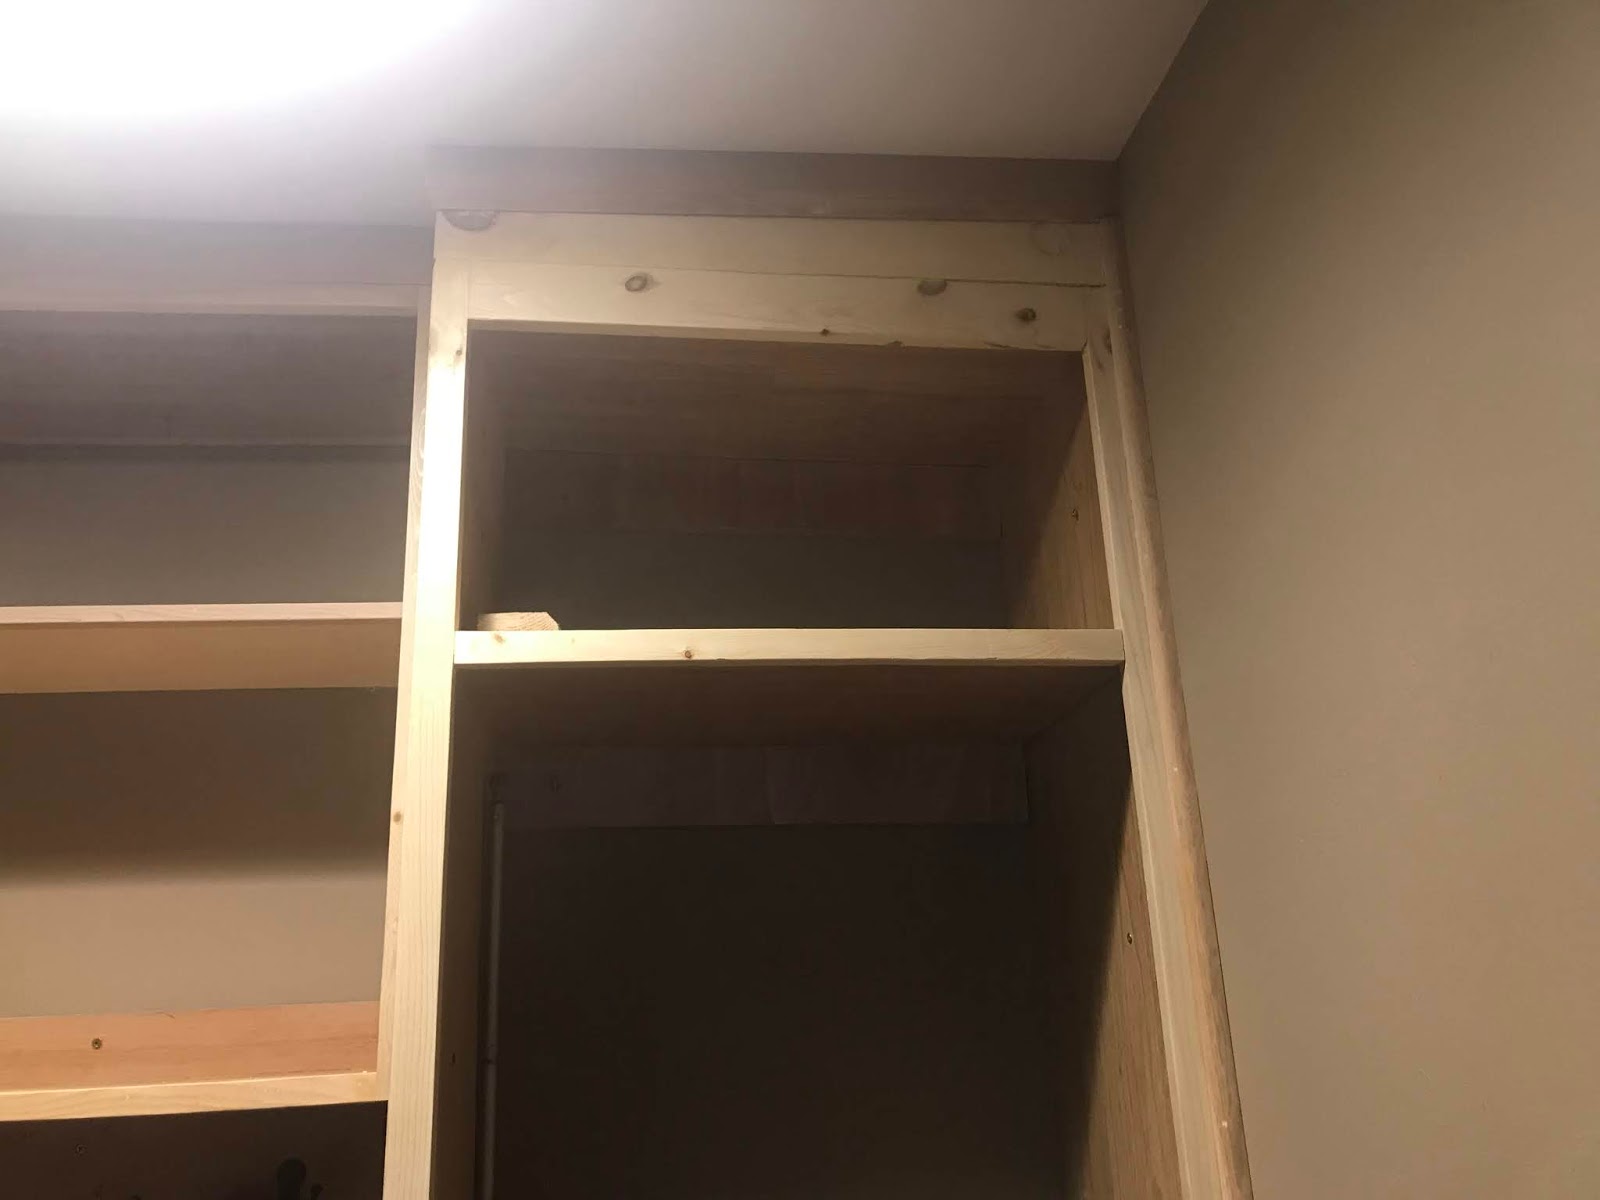
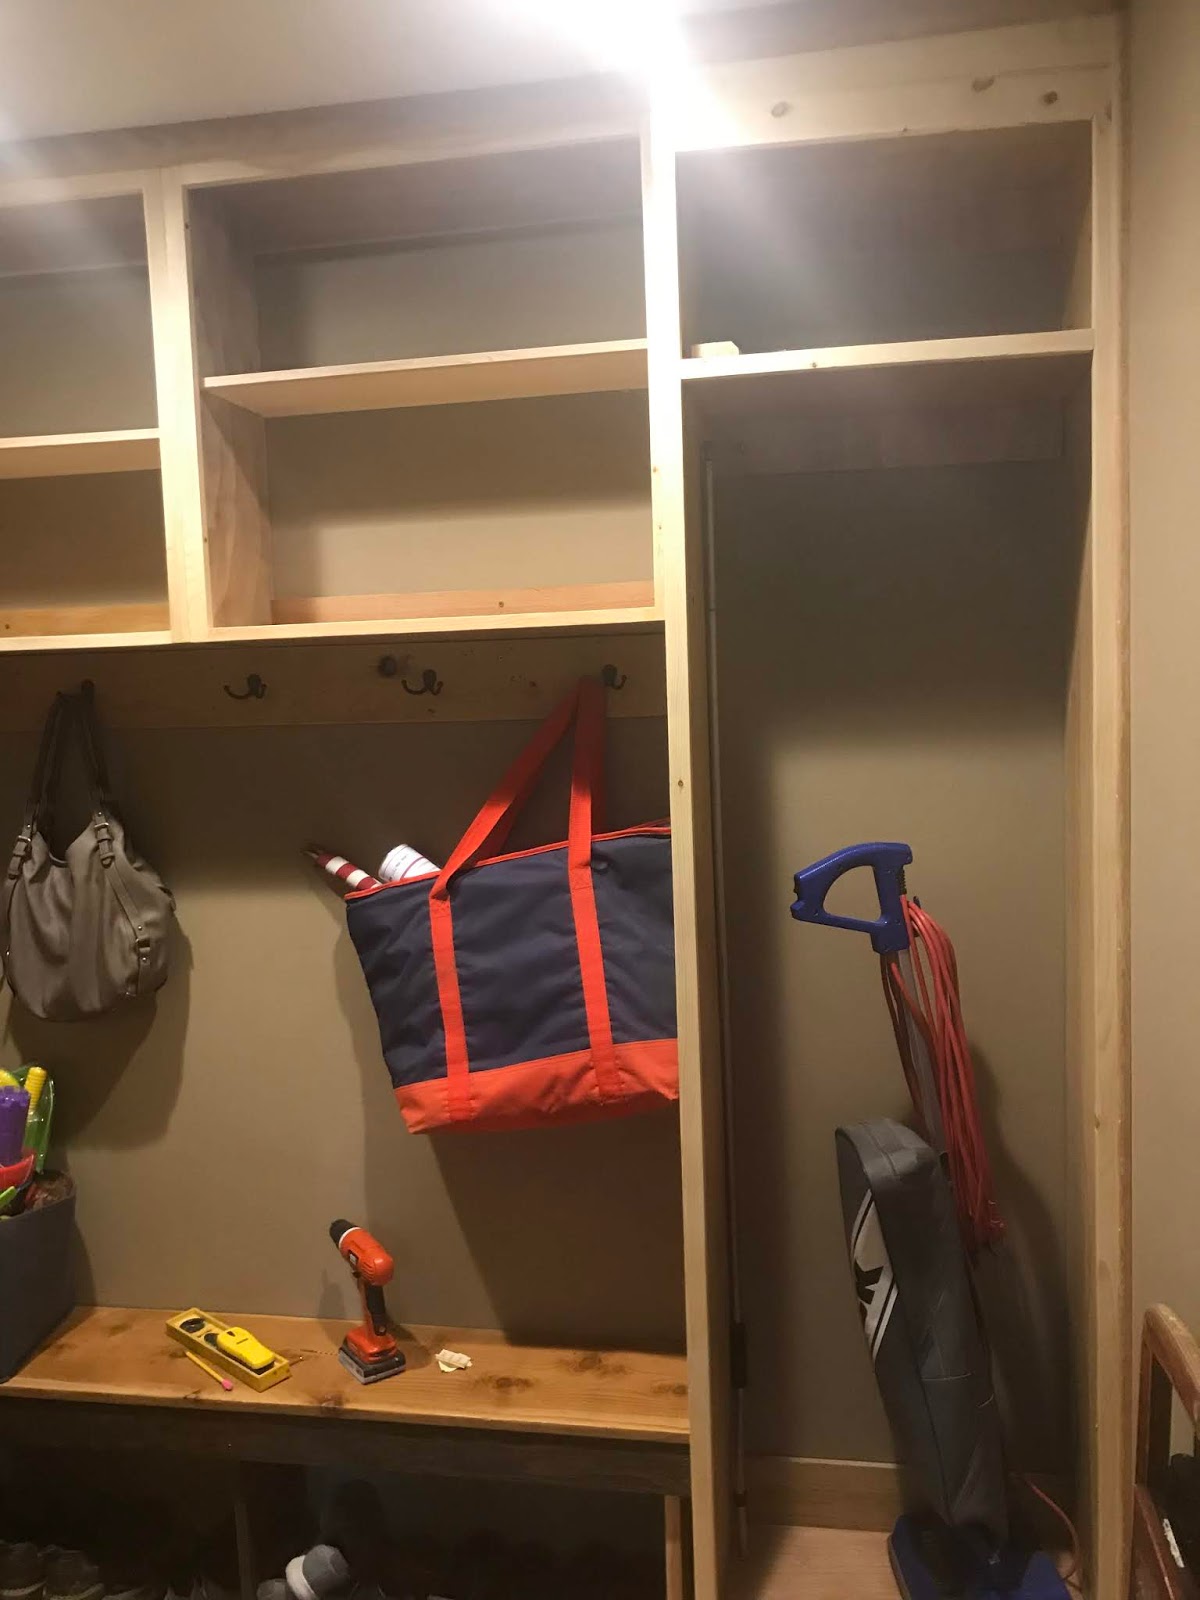
Using the materials leftover from the kitchen and laundry room cabinets I built one tall broom/mop closet and two upper cabinets on a wall in the mud room.  Because I was using what we had, there is a mix of 7/8" plywood and panels that were part of the kitchen installation - 1/2" mdf with hickory laminate.  It took all my brain cells to work out where to use what pieces.  The panel on the wall side of the tall cabinet is one of the laminate pieces.  It was too short, but I had lots of smaller pieces so I cut a piece to add to the bottom of the panel to get it to the right height.  At least, that was the plan.  

I had a heck of a time getting these installed.  I just couldn't get that tall cabinet square and plumb.  I finally got the left side of the cabinet level and plumb and screwed the sucker into the wall - figured the rest of it would get close as I added the upper cabinets.  I was able to add the uppers without any problems, so stepped back and looked at that tall cabinet and the problem became clear as could be!!   that wall panel looked shorter than the other.  I'd swear I had those two side panels laying on top of each other and that they were the same size, but I couldn't have!!  Not the way that cabinet was hanging.  I measured and sure enough, I'd cut the wall panel 1/2" too short!  It should have been clear there was a problem when I attached the bottom and top pieces, but this is where I'll just chalk this up to the heat!!!  It was extremely hot outside where I was working, but, damn - I just screwed up.  You can kind of see it it in these photos.  That middle shelf tilted toward the wall big time (1/2").  It was very noticeable!  And, the bottom was out, too, but unless you laid down on the floor you aren't going to notice how bad that is.  
I should have taken everything down and rebuilt that cabinet, but I didn't have anymore material and I just needed to be done, so I got my hammer and a block of wood and I beat the hell out of that shelf (which I'd glued and nailed in with my nail gun).  I finally got it to move up enough that it doesn't look like something out of a Dr. Seuss book.  When I go back to install the doors I will work on the top face frame piece and get that moved up.  And, the door will be taller than the opening so you shouldn't see a 1/8" discrepancy in the opening - at least I'm hoping that's the case, and that's what I've told them!!


 I'll get the doors made while I'm here at home and hope to get those installed in the next couple of months.  In the meantime, it still holds stuff,  you just have to lean way to the right when you look inside!


Tuesday, May 29, 2018

A new look in my house!

I’m changing things up at my house!  Colors and style anyway. I still love my furniture but I needed a change!  So, I’m going from rust and greens to cream and blue colors and casual comfort.  And I’m cheap and stubborn so I’m trying to get my “look” without spending a lot of money.  I’ve made several slipcovers over the years so, of course, I decided I would make them myself.

These chairs were a green almost tapestry fabric. And now they are cream -after only 40+hours of sewing, 16 yards of fabric, 15 feet of zippers, over 1200 yards of thread, 42-40 feet of piping, and lots of Tylenol for my aching back.  Whew-they are done!!  Not perfect, But done!!  Would I do it again?  NO. The $700 estimate I got  to have them made was looking really good by the time I finished today!  From now on, I’ll stick to woodworking, thank you!

Two Cream colored slipcovers now on my old green floral tapestry chairs.  I love these chairs - they swivel and rock!


I fell in love with a large canvas that was of large bright orange and gold flowers.  My old colors, but I really loved that canvas print.  My friend talked me down - said she'd help me find accessories that would tie it in with everything, if that's what I really wanted.  Thankfully, she had enough faith in me to let me come to the decision to buy the pretty blue canvas print that's now hanging in my living room.  I do like it and it fits in with the colors I was moving towards - but I think I may still go get that orangey one for my bedroom!

I left my sofa - I figured it was enough of a neutral color that I could work it in.  It's a perfectly good sofa and I wouldn't have been able to get rid of it - where would I have stored it!!???  So, it stayed and the picture above it does have that color in the flowers!  It works for me.


A few new things in the dining area, and you can see what a difference the light drapes make.  I'm happy with how things are turning out!

Still a couple of other things to do, a new covering for the round table between the chairs, reupholstering the dining room chairs, (I'm using the same fabric for both, and I'm making them - hoping that it's easier on my back than the chairs!) and finding a place for all the old artwork - they can't live in the hallway forever.

Then I think I'll be done.


Still lots to do before my changes are complete, but each change adds more light and airiness to the room.